What to Send the Venue Before Your Show: Input List, Stage Plot, and Advance

On this page
What an “Advance” Is and Why It Matters
Once a show is booked, there’s one more job before you load the van: advancing the show. An advance is simply the conversation between your band and the venue, usually by email, where everyone confirms the details ahead of time. When are you loading in? How long is your set? What gear does the venue provide, and what do you need to bring?
At the center of the advance are two short documents: an input list and a stage plot. Together they tell the venue’s sound engineer what you’re plugging in and where everyone stands. You don’t need to be a touring band to use them. They matter most at small venues, where one engineer might be setting up three or four bands in a single evening.
Without an advance, the day of the show often goes like this: the venue doesn’t have enough microphones, nobody knew you needed a fourth vocal mic, and your set starts late because sound check turned into a scramble. A one-page email sent a week earlier prevents most of that.
The Input List
An input list is, as Steve La Cerra describes it in a Yamaha guide to sound checks, “a list of all sources on the stage that need to be connected to the PA system.” A source is anything that makes sound the engineer needs to amplify: a voice, a guitar amp, a kick drum.
A good input list includes:
- Channel number. Each source plugs into its own channel on the mixing board. A channel strip is the vertical column of knobs and a fader on the mixer that controls one input’s volume and tone. Your list tells the engineer which source goes on which channel.
- Source name. For example, “Kick,” “Bass,” or “Lead Vox” (vox is shorthand for vocals).
- Mic or DI. Some sources are picked up with a microphone. Others plug in through a DI box (short for “direct inject” or “direct input”). A DI box is a small box that converts an instrument’s signal, such as a bass or keyboard, into one the mixer can use cleanly over a long cable. Most mics and DI boxes connect to the stage with XLR cables, the standard three-pin microphone cables with round connectors.
- Stage location. This is optional but useful, for example “stage left” or “drum riser.”
- Monitor preferences. Monitors are the speakers on stage that point back at the band so you can hear yourselves. Note how many each person needs and what they want to hear in theirs.
You can make the list in any spreadsheet app or a plain email. Here’s a realistic example for a four-piece rock band with two guitars, bass, and drums, where three members sing:
INPUT LIST – The Example Band
CH SOURCE MIC/DI NOTES
1 Kick Mic Bring own kick mic if needed
2 Snare Mic
3 Rack Tom Mic
4 Floor Tom Mic
5 Overhead L Mic Can drop to 1 overhead if short on mics
6 Overhead R Mic
7 Bass DI Bass amp has XLR out
8 Guitar 1 (Sam) Mic on amp Stage right
9 Guitar 2 (Jo) Mic on amp Stage left
10 Lead Vox (Sam) Mic Stage right
11 Vox 2 (Jo) Mic Stage left
12 Vox 3 (Alex, drums) Mic Boom stand needed
MONITORS
Mix 1 – Sam (SR): lots of lead vox, some guitar 1
Mix 2 – Jo (SL): vox 2, lead vox, guitar 2
Mix 3 – Alex (drums): bass, lead vox, kick
Mix 4 – Center (bass): kick, lead vox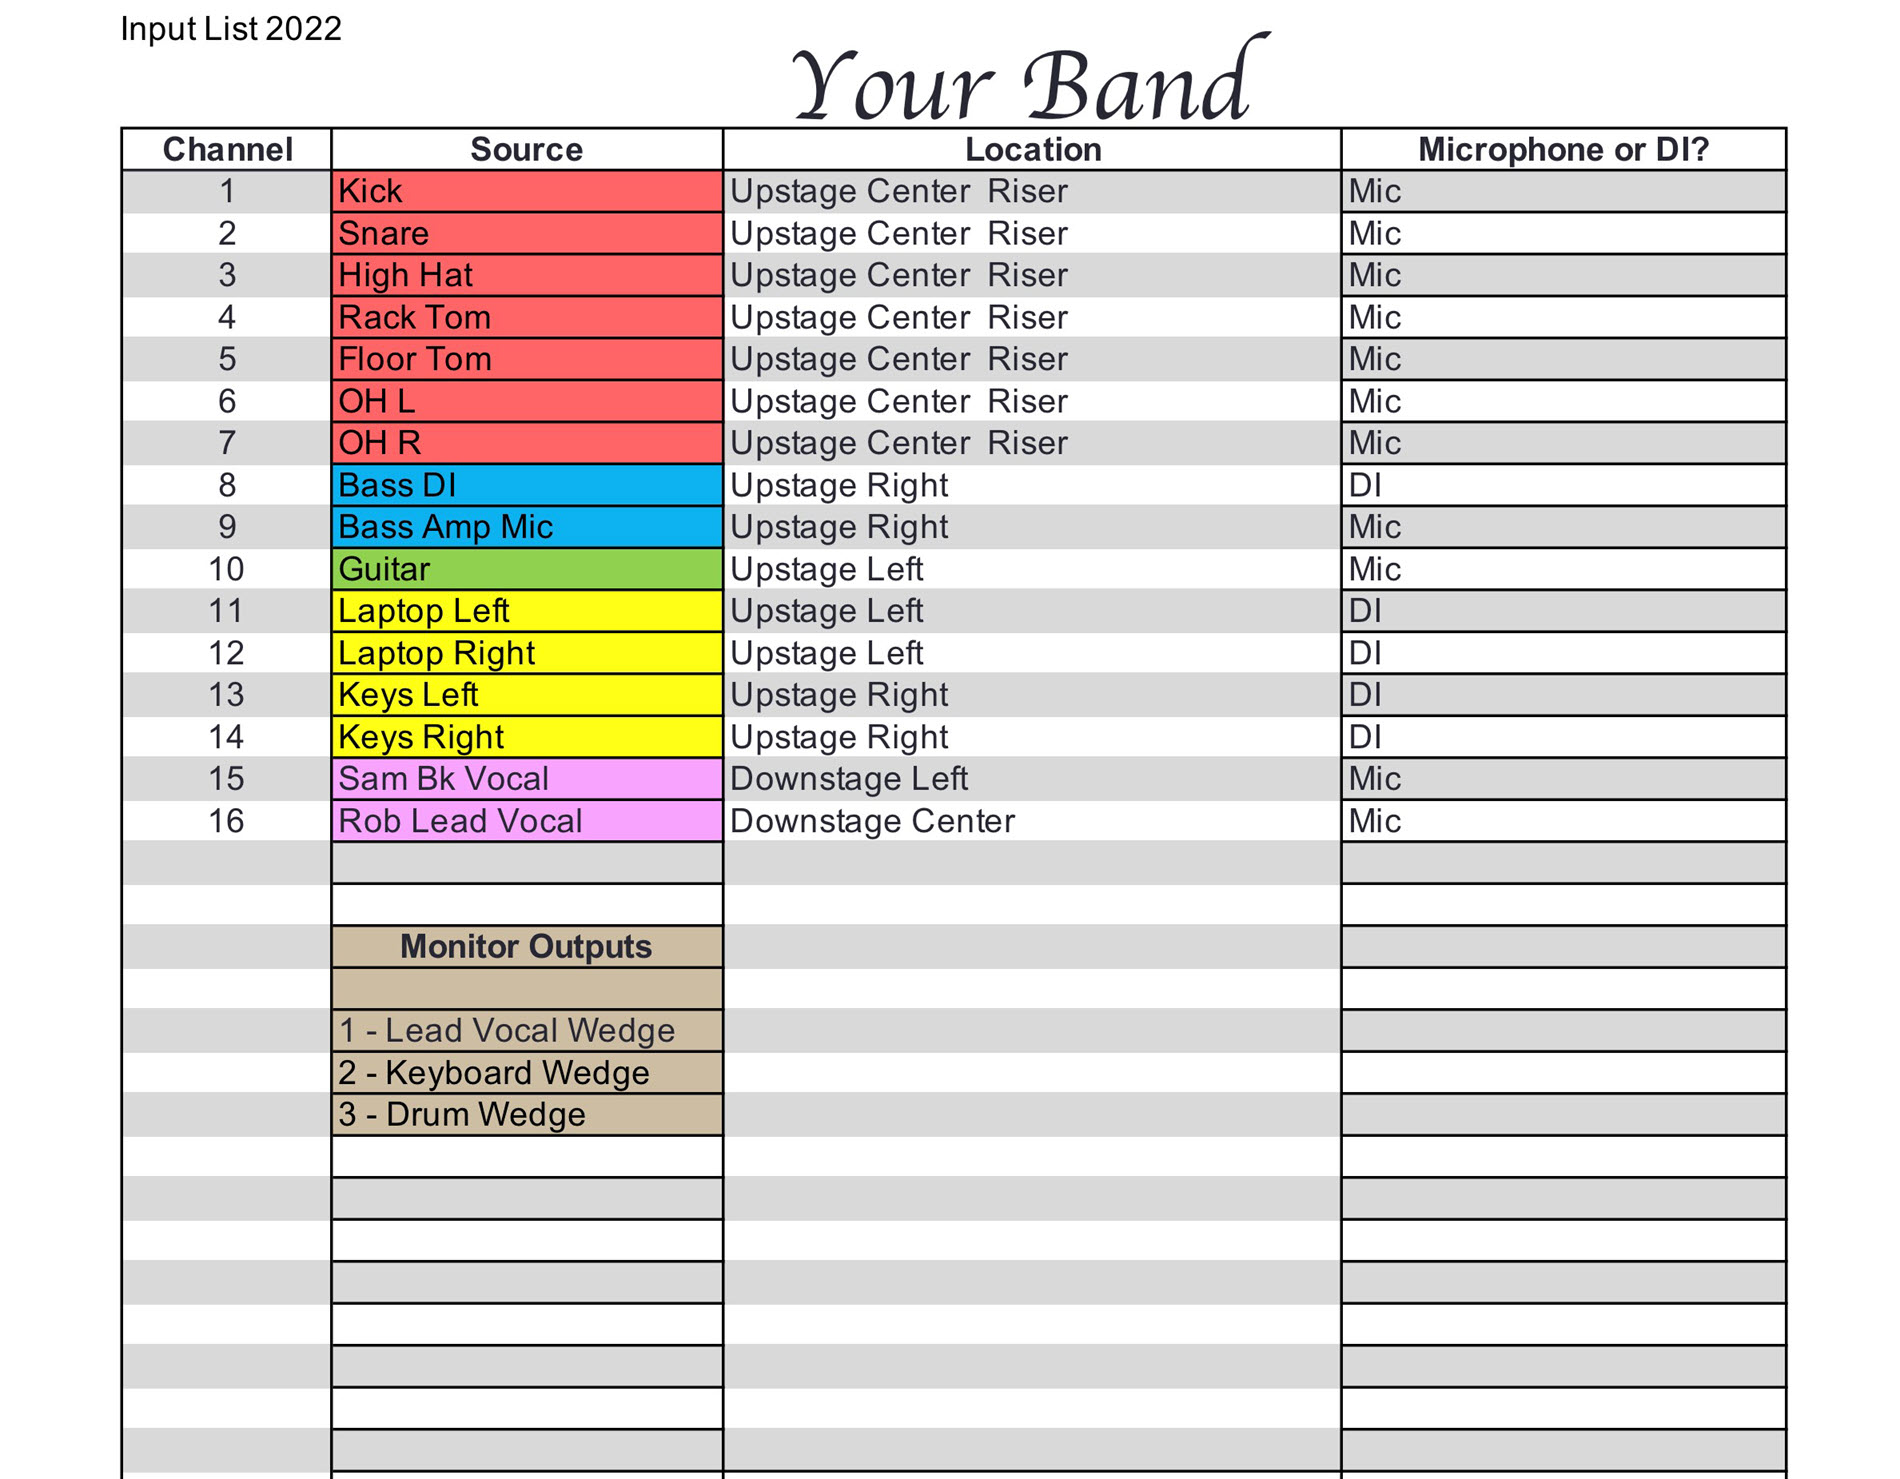 Via hub.yamaha.com
Notice the line about dropping to one overhead mic. Small rooms often have limited mics and channels, so flagging where you can be flexible makes the engineer’s job easier.
The Stage Plot
A stage plot is a drawing of your setup as seen from above. It shows where each person stands, where the amps and drum kit go, where the monitors should sit, and where you need power (electrical outlets for amps, pedalboards, and keyboards).
La Cerra recommends labeling mics and DIs with numbers that match your input list, and writing each band member’s name at their position so the crew can get to know who’s who. You may also see the terms downstage (the edge nearest the audience) and upstage (the back of the stage, where the drummer usually sits). “Stage left” and “stage right” are from the band’s point of view facing the audience.
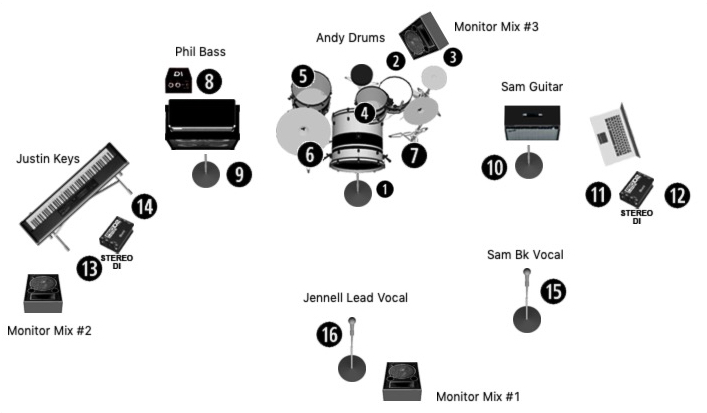 Via hub.yamaha.com
There are apps that make polished stage plots, but as La Cerra notes, “even a hand-drawn sketch can work just fine.” For a small club, a neat drawing on paper, photographed in good light, is perfectly acceptable. Just make sure it’s readable and the labels match your input list.
The Advance Checklist: Five Steps
Use this as your template when emailing the venue or booker:
- Confirm show details. Date, load-in time, sound check time (if any), doors, set time, set length, and the order of bands. Ask who your day-of contact is.
- Send your tech rider. For a small band, a “tech rider” can simply be your input list and stage plot attached to the email, plus a line or two about anything special, such as needing a keyboard stand.
- Sort out logistics. Where do you park and load in? Is there a green room or somewhere to store cases? Are you sharing a drum kit or amps with other bands (called “backlining”)? Who brings what?
- Confirm PA and monitors. Ask how many channels and monitor mixes the venue has, how many mics and DI boxes they supply, and whether there’s an engineer. If they’re short, you’ll know to bring your own.
- Confirm the guest list. Ask how many guest spots you get, who to send names to, and the deadline.
Keep the email short and put the key details at the top. Busy venue staff appreciate being able to find everything quickly.
How Far Ahead to Send It
There’s no universal rule, but these are sensible starting points:
- Small venues (bars, clubs, house shows): About one to two weeks before the show is usually enough. Then send a brief confirmation a day or two out, especially if anything has changed.
- Larger venues or festivals: Send it earlier, often several weeks ahead. These shows typically involve more people, and the venue may send its own advance form with a deadline. Follow their timeline.
If the venue gives you a deadline, that’s the one that counts. If they don’t reply, a polite follow-up a few days later is normal and expected.
Common Mistakes
Not sending anything at all. Some bands assume the venue will figure it out. Sometimes they will, but you’re gambling with your sound check time and possibly your set.
Using jargon the venue won’t understand, or inventing your own. Clear, standard labels like “Kick,” “Bass – DI,” and “Lead Vox” work everywhere. Avoid inside jokes (“Mike’s Beast Rig”) and vague notes like “the usual drum stuff.” On the other hand, don’t pile on technical terms you’re unsure of. If you aren’t certain what something is called, describe it plainly: “Bass amp has a cable output on the back.”
Waiting until load-in day. Handing the engineer a crumpled list as you walk in is better than nothing, but by then it’s too late for them to find extra mics, plan the channel layout, or tell you they only have three monitor mixes. The point of an advance is to solve problems before the day.
Not matching the input list to the stage plot. If channel 9 is “Guitar 2” on the list, it should be “9 – Guitar 2” on the drawing too.
Forgetting to update it. If you add a keyboard player or swap to an acoustic guitar, revise both documents before the next show.
Make your input list and stage plot once, save them somewhere the whole band can reach, and you’ll have a ready-to-send advance for every gig from here on.
Sources
Tools of the Trade: Seven Ways to Ensure a Smooth Sound Check, Steve La Cerra, Yamaha Music (hub.yamaha.com)