How to Run a Soundcheck for Your Band


On this page
What Soundcheck Is and Why It Matters
Soundcheck is the session before doors open where the band and the sound person (often called the engineer) make sure every instrument and microphone is working, set sensible volume levels, and get the band hearing itself clearly on stage. It’s also your chance to test your gear and get comfortable in an unfamiliar room. A smooth soundcheck almost always leads to a better show, and most of what makes it smooth happens before you load in.
What to Bring: Input List and Stage Plot
Two simple documents will save more time than anything else you do. Send them to the venue or engineer ahead of the show, and bring printed copies on the day.
The Input List
An input list is a table of every sound source on stage that needs to go into the PA (the venue’s speaker system). Each row is one “input,” meaning one microphone or one direct connection. According to Yamaha’s guide to sound checks, a good input list includes:
- Channel number: the order the inputs will be plugged into the mixing console (the desk the engineer uses to control volume and tone for each input).
- Instrument name: for example, “Kick,” “Snare,” “Bass,” “Lead Vox.”
- Mic or DI: whether that source uses a microphone or a DI (direct inject) box. A DI is a small box that lets an instrument like a bass, keyboard, or acoustic guitar plug straight into the PA without a microphone.
- Location (optional): roughly where the source sits on stage.
- Monitor needs: what each player wants to hear (more on that below).
A spreadsheet works perfectly. Why does the engineer care? If they’ve never seen your band, the input list tells them exactly how many channels, mics, and DI boxes to prepare before you even arrive.
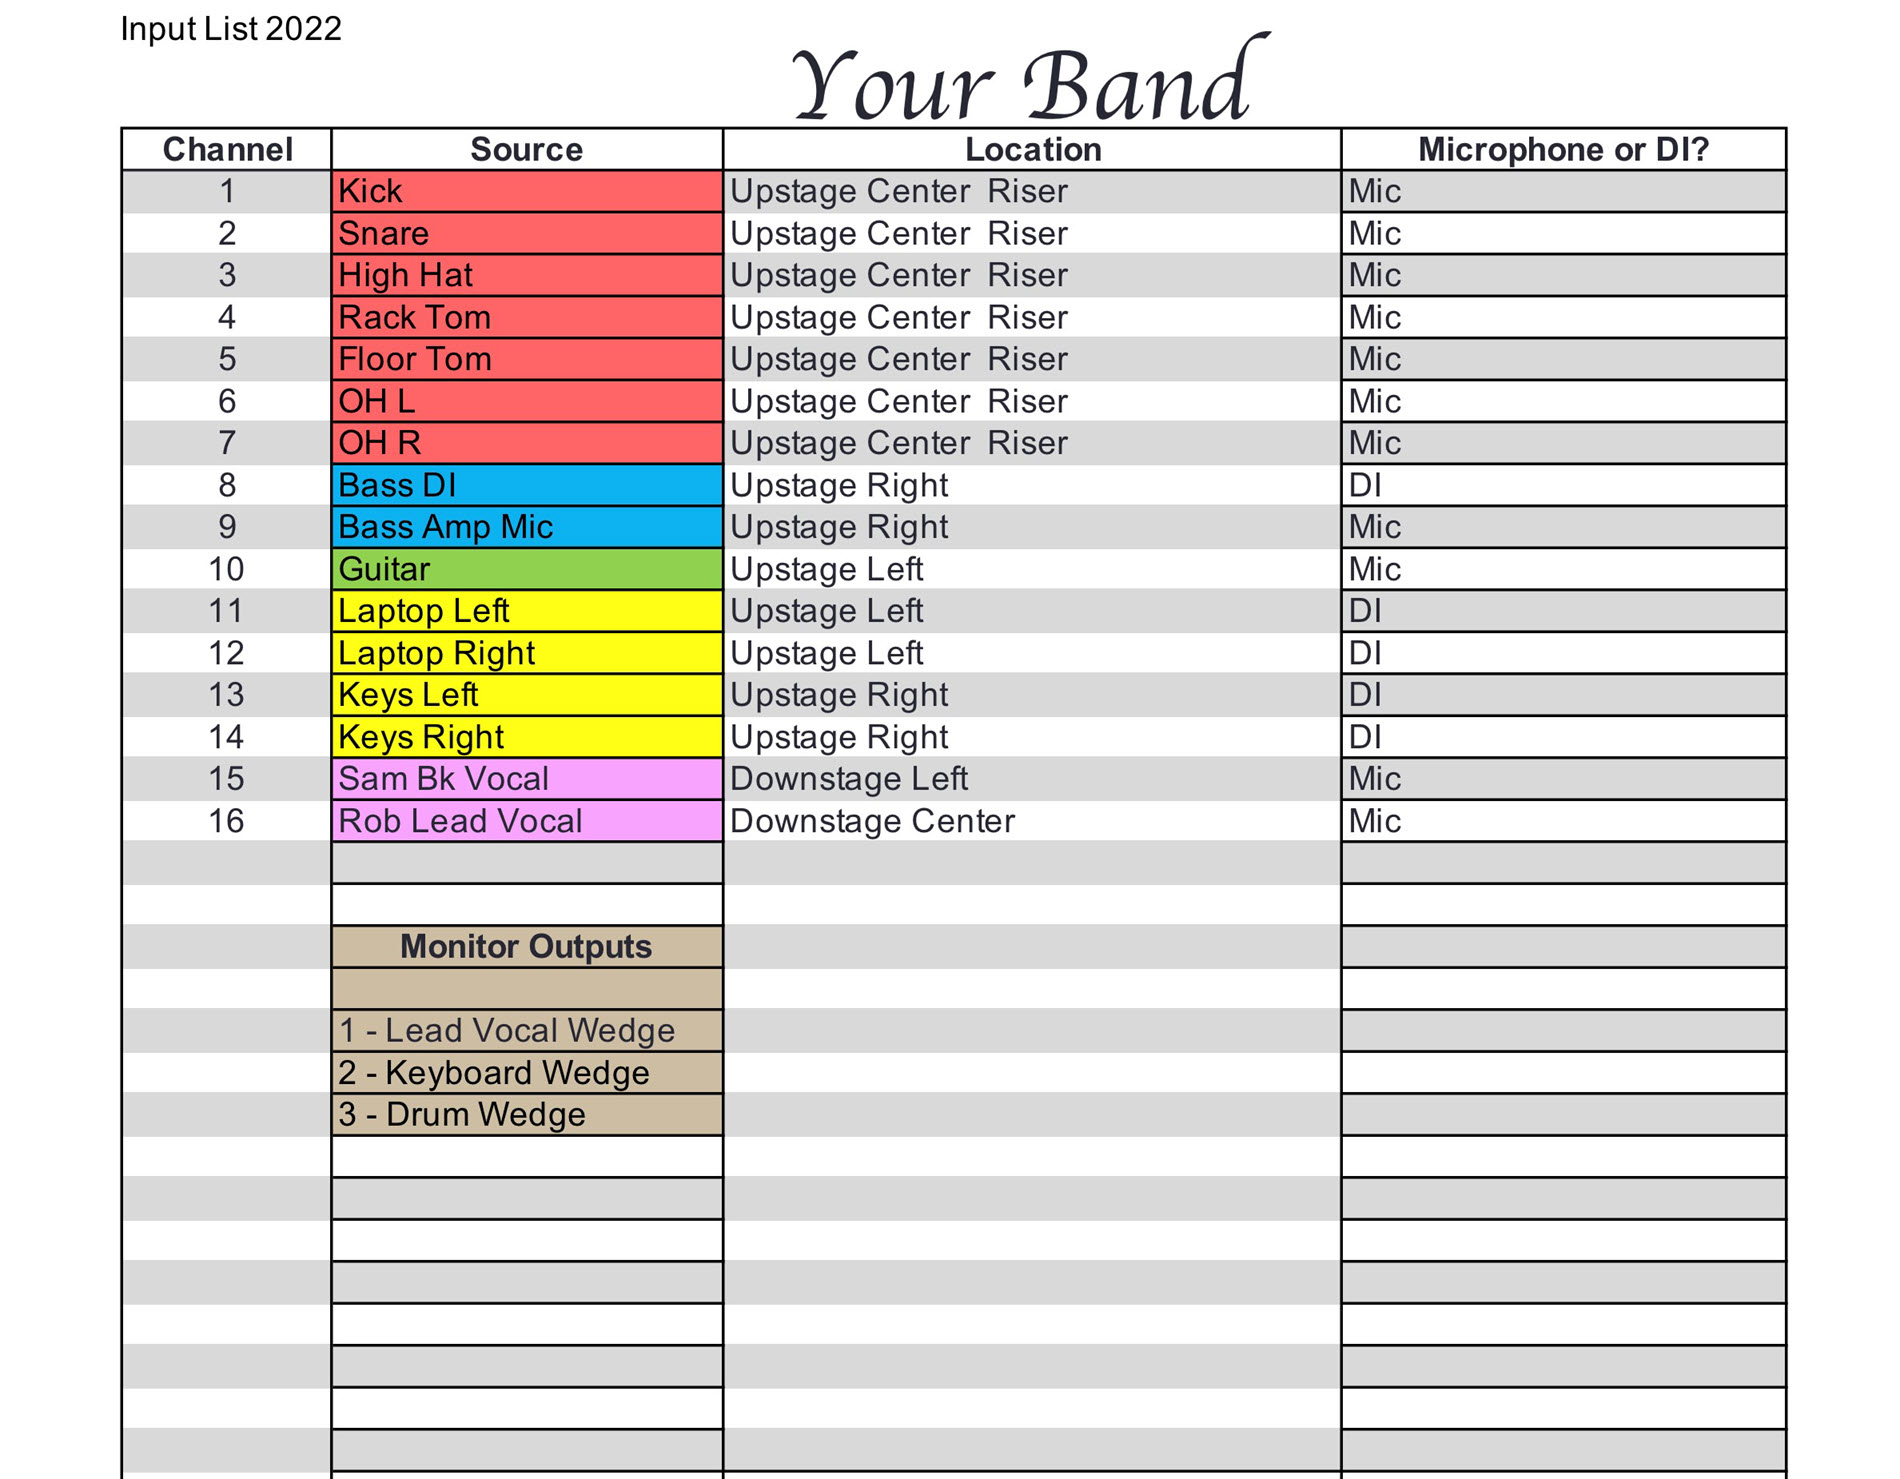 Via hub.yamaha.com
The Stage Plot
A stage plot is a simple bird’s-eye drawing of where everyone and everything sits on stage. Mark:
- Each instrument and amp
- Each mic and DI, numbered to match your input list
- Where you want monitors, the speakers on stage (often wedge-shaped floor speakers called “wedges”) that point back at the band so you can hear yourselves
- Each band member’s name at their position
A hand-drawn sketch is fine. Software can make it look slicker, but clarity matters more than polish.
You may hear two old theater terms: downstage is the front edge, closest to the audience; upstage is the back, usually where the drummer sits.
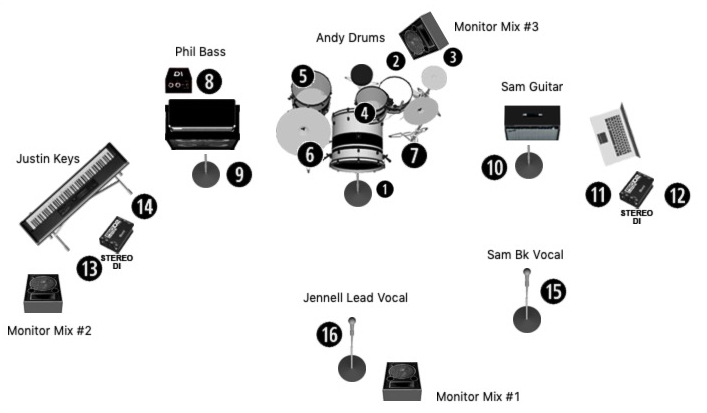 Via hub.yamaha.com
Order of Operations
Soundcheck usually follows three stages. Knowing the sequence helps you stay quiet when you should and be ready when it’s your turn.
1. Line Check
What it is: A quick test that every mic and DI is plugged into the right channel and passing clean signal, with no buzzes, crackles, or dead lines.
Engineer: Plugs everything in according to your input list (this is called “patching”), then watches each channel on the console.
Band: When asked, play or speak into only the input being checked. Hit the kick drum steadily, play a few bars on bass, say “check, one, two” into your vocal mic. Play at the volume you’ll actually play at during the show. If you play quietly at soundcheck and loud at the gig, the levels set now won’t fit.
Tip: Engineers often like the drummer and bassist set up first so drum mics can go up without everyone else waiting around. Drummers: arrange your kit before mics go on, so stands don’t end up in your way.
2. Monitor Check
What it is: Building what each player hears from their monitor. Each person or position can often get a different blend, called a monitor mix.
Engineer: Uses a talkback mic, a mic at the console that the engineer speaks through into your monitors, to ask what you need. Many engineers start with vocals, because most performers rely on the vocals as their main reference point. Others start with the kick drum and work through the channel list. Either is normal.
Band: Listen, then ask for specific changes. Each player usually starts by getting enough of themselves, then adds what they need from others. A drummer may want bass and vocals; a singer may want their own voice and a bit of keys for pitch. Just ask for what you need to play well, not a full mix of the whole band.
This is also a good time to agree on hand signals for adjustments during the show, such as pointing up at your monitor for “more” or down for “less.”
3. FOH Balance
What it is: Setting the mix the audience hears. FOH stands for “front of house,” meaning the main speakers facing the crowd and the console position out in the room.
Engineer: Brings instruments into the main mix one at a time to hear how the PA and the room interact, often building from drums and bass or around the vocals.
Band: Play a song, ideally one with your loudest and quietest moments, so the engineer can hear the full range. Play it like you mean it.
What the Band Does vs. What the Sound Person Does
| The band | The sound person |
|---|---|
| Sends the input list and stage plot in advance | Plans channels, mics, and DI boxes |
| Arrives on time, set up and tuned | Patches and tests every line |
| Plays one input at a time when asked; stays quiet otherwise | Sets input levels and leaves room for the band getting louder later |
| Asks for clear, specific monitor changes | Adjusts monitor mixes |
| Plays a representative song at show volume | Balances the FOH mix for the room |
| Agrees on signals for mid-show requests | Watches for those signals during the set |
The biggest etiquette rule: don’t noodle. Random playing while someone else is being checked makes it hard for the engineer to hear and slows everything down. Also, change batteries in wireless or active gear before you arrive, and stay out from in front of the speakers while you’re fiddling with cables.
Quick Troubleshooting: What to Say When Something Sounds Wrong
Be specific: who needs to hear what, more or less, and where. Here are some phrases engineers will understand right away.
“Can I get more of me in my wedge?” You can’t hear yourself. The engineer turns up your input in your monitor. If the stage is very loud, try asking for less of other instruments instead of endlessly adding more of yourself; that keeps the mix clearer.
“Less guitar in my wedge, please.” Something else is drowning you out. Name the instrument you want turned down.
“I’m getting enough [instrument] from the stage, I don’t need it in my monitor.” Loud amps and drums often carry fine on their own. Removing them from your monitor makes room for vocals.
“There’s feedback at my position.” Feedback is that howl or ring when a mic picks up a speaker’s sound and loops it. The engineer may move the monitor or pull the level down. You can help by not pointing your mic at the monitor and keeping it close to your mouth when singing.
“Channel 6 is silent” / “My DI is buzzing.” Use the channel number or instrument name from your input list. It’s the fastest way for the engineer to find the problem. Check your own cables, battery, and instrument volume knob too.
“Can I get a little reverb on my vocal in the monitor?” A touch of reverb (a sense of space or echo) can make singing more comfortable. Just ask.
“That’s good, thanks!” Tell the engineer when something is right, so they can move on. Soundcheck time is limited, and clear “done” signals keep things moving.
Finally, be friendly. Learning the engineer’s name and thanking them goes a long way. They’re on your team, and a good working relationship makes for a better show.
Sources
Tools of the Trade: Seven Ways to Ensure a Smooth Sound Check, Steve La Cerra, Yamaha Music (hub.yamaha.com)
Strategies and a Suggested Standard Operating Procedure for Soundcheck, Christina Masha Milinusic, SoundGirls.org